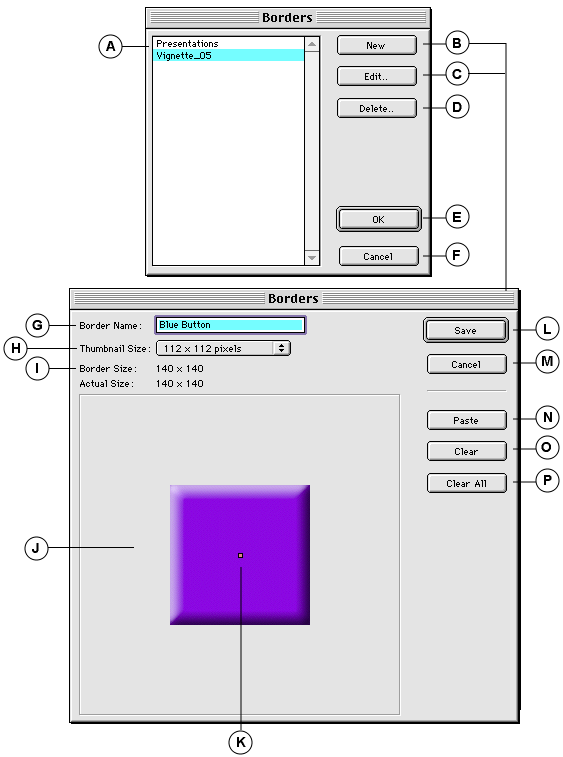
The Borders dialogs allow you to add thumbnail borders to the catalog, and change the options of currently installed borders. Before a border can be displayed you must select it from the Borders List in the Customize Galleries dialog (View > Customize: Thumbnail tab or Record tab).
|
A |
Borders List: Displays a list of Borders available in the catalog. |
|
B |
New: Opens the Edit Borders dialog to create and name a new border. |
|
C |
Edit: Opens the Edit Borders dialog allowing you to edit the currently selected border (A). |
|
D |
Delete: Deletes the currently selected border. |
|
E |
OK: Close the dialog box and save any new or modified Borders. |
|
F |
Cancel: Close the dialog box without saving any changes. |
|
G |
Border Name: Displays name of border being edited. Enter name for new border here. |
|
H |
Thumbnail Size: Select size of thumbnail border is being created for. |
|
I |
Dimensions: Displays border size and actual size. |
|
J |
Border Box: Represents the area allowed for the border. Box size changes based on the selected thumbnail size. The border that you paste is displayed here. |
|
K |
Transparency Pixel: Sets the color map for the transparency. |
|
L |
Save: Close the dialog and save the Border box(es). |
|
M |
Cancel: Close the dialog box without making any changes. |
|
N |
Paste: Copy the border to the system clipboard, then click this button to paste it into the Border box (J). |
|
O |
Clear: Clears the Border box for the currently selected thumbnail size. |
|
P |
Clear All: Clears all Border boxes. |
See also: